Installation and Configuration
This section explains how to install and configure a new Meridian instance, including the following tasks:
-
Install all required OpenNMS Meridian components, including PostgreSQL, on a single node.
-
Run Meridian core and PostgreSQL with the default configuration.
The default configuration is not optimized to run in a production environment or monitor large networks. -
By default, your time series database is RRDtool, which persists RRD files on the local file system.
-
-
Sign in to the web UI and change the
adminaccount’s default password.
DNS considerations
If you are planning a large deployment, you may need to review your DNS configuration to ensure name lookups can be processed quickly. DNS lookups may be preformed by different processes, including while provisioning new nodes and when receiving syslog messages. It is vital that DNS lookups can be performed quickly to prevent them from becoming a bottleneck, which can happen if your deployment covers thousands of nodes. One way to mitigate DNS performance is to setup your Meridian as a secondary DNS server so that it is able to self-host DNS records for your network.
Requirements
The following components and settings are required to set up a new Meridian instance:
-
Credentials to access the Meridian repositories.
-
A Linux physical server, or a virtual machine running a supported Linux operating system.
-
Internet access to download the installation packages.
-
A working DNS server, and a localhost and server name that resolve properly.
-
A system user with administrative permissions (
sudo) to perform installation. -
A SELinux policy that permits binding to the ICMP service, if necessary.
If you do not include the appropriate SELinux policy, Meridian may generate an ICMP permissions error when starting up (see SELinux and ICMP permissions).
| Time synchronization is a critical part of operating a monitoring system. Ensure you have a functional time synchronization process running with your operating system. If you are not familiar with this topic, the knowledgebase article Ensure time synchronization for your OpenNMS components is a good starting point. |
Set up PostgreSQL
PostgreSQL 14 and 15 use the scram-sha-256 password authentication method by default.
If you use older versions of PostgreSQL, you should change the method in postgresql.conf and in pg_hba.conf before installing the Meridian core instance.
|
sudo dnf install langpacks-en glibc-all-langpacks -y
sudo localectl set-locale LANG=en_US.UTF-8
sudo localectl
sudo dnf makecache
sudo dnf update -y
sudo reboot
sudo dnf info postgresql-server| These procedures use a specific PostgreSQL version. Make sure you reference your current PostgreSQL version. |
sudo dnf -y install https://download.postgresql.org/pub/repos/yum/reporpms/EL-9-x86_64/pgdg-redhat-repo-latest.noarch.rpm
sudo dnf -y install postgresql14-serversudo /usr/pgsql-14/bin/postgresql-14-setup initdbsudo systemctl enable --now postgresql-14sudo -i -u postgres createuser -P opennms
You must provide a secure password for the opennms database user account.
This guide uses YOUR-OPENNMS-PASSWORD as a placeholder.
|
sudo -i -u postgres createdb -O opennms opennmssudo -i -u postgres psql -c "ALTER USER postgres WITH PASSWORD 'YOUR-POSTGRES-PASSWORD';"
Change YOUR-POSTGRES-PASSWORD to a secure one.
The superuser is required to be able to initialize and change the database schema for installation and updates.
|
sudo vi /var/lib/pgsql/14/data/pg_hba.confhost all all 127.0.0.1/32 md5 (1)
host all all ::1/128 md5 (1)| 1 | Change method from ident to md5 for IPv4 and IPv6 on localhost. |
sudo systemctl reload postgresql-14sudo dnf -y install postgresql-server postgresqlsudo postgresql-setup --initdb --unit postgresqlsudo systemctl enable --now postgresqlsudo -i -u postgres createuser -P opennms
You must provide a password for the opennms database user.
This guide uses YOUR-OPENNMS-PASSWORD as a placeholder.
Please set a secure password.
|
sudo -i -u postgres createdb -O opennms opennmssudo -i -u postgres psql -c "ALTER USER postgres WITH PASSWORD 'YOUR-POSTGRES-PASSWORD';"
Change YOUR-POSTGRES-PASSWORD to a secure one.
The superuser is required to be able to initialize and change the database schema for installation and updates.
|
sudo vi /var/lib/pgsql/data/pg_hba.confhost all all 127.0.0.1/32 md5(1)
host all all ::1/128 md5(1)| 1 | Change method from ident to md5 for IPv4 and IPv6 on localhost. |
sudo systemctl reload postgresqlsudo yum -y install https://download.postgresql.org/pub/repos/yum/reporpms/EL-7-x86_64/pgdg-redhat-repo-latest.noarch.rpmsudo yum -y install postgresql12-server postgresql12sudo /usr/pgsql-12/bin/postgresql-12-setup initdbsudo systemctl enable --now postgresql-12sudo -i -u postgres createuser -P opennms
You must provide a password for the opennms database user.
This guide uses YOUR-OPENNMS-PASSWORD as a placeholder.
Please set a secure password.
|
sudo -i -u postgres createdb -O opennms opennmssudo -i -u postgres psql -c "ALTER USER postgres WITH PASSWORD 'YOUR-POSTGRES-PASSWORD';"
Change YOUR-POSTGRES-PASSWORD to a secure one.
The superuser is required to initialize and change the database schema for installation and updates.
|
sudo vi /var/lib/pgsql/12/data/pg_hba.confhost all all 127.0.0.1/32 md5(1)
host all all ::1/128 md5(1)| 1 | Change method from ident to md5 for IPv4 and IPv6 on localhost. |
sudo systemctl reload postgresql-12Install the core instance
| For security reasons, Meridian is designed to run within an organization’s protected intranet. Do not expose the web console or sign in pages directly to the Internet without appropriate isolation controls (for example, a VPN with multi-factor authentication). |
cat << EOF | sudo tee /etc/yum.repos.d/opennms-meridian.repo
[meridian]
name=Meridian for Red Hat Enterprise Linux and CentOS
baseurl=https://REPO_USER:REPO_PASS@meridian.opennms.com/packages/2023/stable/rhel9(1)
gpgcheck=1
gpgkey=http://yum.opennms.org/OPENNMS-GPG-KEY
EOF

sudo rpm --import https://yum.opennms.org/OPENNMS-GPG-KEY| 1 | Replace the REPO_USER and REPO_PASS with your Meridian subscription credentials. |
sudo dnf -y install meridianIf you want time series trending and forecast functions, you must install the R project packages. The additional download size for packages is ~390MB.
Note that R-core packages require that you have a PowerTools repository enabled.
sudo dnf config-manager --set-enabled powertools
sudo dnf -y install epel-release
sudo dnf -y install R-core| Disable the OpenNMS Meridian repository after installation to prevent unwanted upgrades when upgrading other packages on the server. After upgrading, Meridian requires manual steps to upgrade configuration files or migrate database schemas to a new version. We recommend that you exclude the Meridian packages from updates except when you plan to perform an upgrade. |
sudo dnf config-manager --disable meridiansudo dnf -y install tree
tree /opt/opennms -L 1/opt/opennms
├── bin
├── contrib
├── data
├── deploy
├── etc
├── jetty-webapps
├── lib
├── logs -> /var/log/opennms
├── share -> /var/opennms
└── systemcat << EOF | sudo tee /etc/yum.repos.d/opennms-meridian.repo
[meridian]
name=Meridian for Red Hat Enterprise Linux and CentOS
baseurl=https://REPO_USER:REPO_PASS@meridian.opennms.com/packages/2023/stable/rhel8(1)
gpgcheck=1
gpgkey=http://yum.opennms.org/OPENNMS-GPG-KEY
EOF
sudo rpm --import https://yum.opennms.org/OPENNMS-GPG-KEY| 1 | Replace the REPO_USER and REPO_PASS with your Meridian subscription credentials. |
sudo dnf -y install meridianIf you want time series trending and forecast functions you must install the R project packages. The additional download size for packages is ~390 MB.
Note that R-core packages require that you have a PowerTools repository enabled.
sudo dnf config-manager --set-enabled powertools
sudo dnf -y install epel-release
sudo dnf -y install R-core| Disable the OpenNMS Meridian repository after installation to prevent unwanted upgrades when upgrading other packages on the server. After upgrade, Meridian requires manual steps to upgrade configuration files or migrate database schemas to a new version. We recommend that you exclude the Meridian packages from update except when you plan to perform an upgrade. |
sudo dnf config-manager --disable meridiansudo dnf -y install tree
tree /opt/opennms -L 1/opt/opennms
├── bin
├── contrib
├── data
├── deploy
├── etc
├── jetty-webapps
├── lib
├── logs -> /var/log/opennms
├── share -> /var/opennms
└── systemcat << EOF | sudo tee /etc/yum.repos.d/opennms-meridian.repo
[meridian]
name=Meridian for Red Hat Enterprise Linux and CentOS
baseurl=https://REPO_USER:REPO_PASS@meridian.opennms.com/packages/2023/stable/rhel7(1)
gpgcheck=1
gpgkey=http://yum.opennms.org/OPENNMS-GPG-KEY
EOF
sudo rpm --import https://yum.opennms.org/OPENNMS-GPG-KEY| 1 | Replace the REPO_USER and REPO_PASS with your Meridian subscription credentials. |
sudo yum -y install meridianIf you want time series trending and forecast functions you must install the R project packages. The additional download size for packages is ~390 MB.
Note that R-core packages require that you have a PowerTools repository enabled.
sudo dnf config-manager --set-enabled powertools
sudo yum -y install epel-release
sudo yum -y install R-core| Disable the OpenNMS Meridian repository after installation to prevent unwanted upgrades when upgrading other packages on the server. After upgrade, Meridian requires manual steps to upgrade configuration files or migrate database schemas to a new version. We recommend that you exclude the Meridian packages from update except when you plan to perform an upgrade. |
sudo yum -y install yum-utils
sudo yum-config-manager --disable meridiansudo yum -y install tree
tree /opt/opennms -L 1/opt/opennms
├── bin
├── contrib
├── data
├── deploy
├── etc
├── jetty-webapps
├── lib
├── logs -> /var/log/opennms
├── share -> /var/opennms
└── systemSet up the core instance
You can store your PostgreSQL credentials in the secure credentials vault.
To do this, use the scvcli command line utility to add the credentials, and reference these credentials in opennms-datasources.xml:
-
Create encrypted credentials for the PostgreSQL database connections:
sudo -u opennms ${OPENNMS_HOME}/bin/scvcli set postgres opennms password (1)
sudo -u opennms ${OPENNMS_HOME}/bin/scvcli set postgres-admin postgres password
1 Replace both passwordinstances with the actual passwords for youropennmsandpostgresdatabase accounts. -
Edit
opennms-datasources.xmlwithvi:sudo -u opennms vi /opt/opennms/etc/opennms-datasources.xml -
Set encrypted credentials to access the PostgreSQL database:
<jdbc-data-source name="opennms"
                    database-name="opennms" (1)
                    class-name="org.postgresql.Driver"
                    url="jdbc:postgresql://localhost:5432/opennms"
                    user-name="${scv:postgres:username}" (2)
                    password="${scv:postgres:password}" /> (3)

<jdbc-data-source name="opennms-admin"
                    database-name="template1"
                    class-name="org.postgresql.Driver"
                    url="jdbc:postgresql://localhost:5432/template1"
                    user-name="${scv:postgres-admin:username}" (4)
                    password="${scv:postgres-admin:password}" /> (5)
1 Set the database name that Meridian should use. 2 Set the user name to access the opennms database table. 3 Set the password to access the opennms database table. 4 Set the postgres user for administrative access to PostgreSQL. 5 Set the password for administrative access to PostgreSQL.
sudo /opt/opennms/bin/runjava -ssudo /opt/opennms/bin/install -disecho "JAVA_HEAP_SIZE=16384" | sudo tee ${OPENNMS_HOME}/etc/opennms.conf
echo "MAXIMUM_FILE_DESCRIPTORS=512000" | sudo tee ${OPENNMS_HOME}/etc/opennms.conf| These values are provided as examples; ideal values will vary based on your environment and workload |
sudo systemctl enable --now opennmssudo firewall-cmd --permanent --add-port=8980/tcp
sudo systemctl reload firewalldFirst-time sign in and data choices
After you start the Meridian core services, you can access the web application at http://core-instance-ip:8980/opennms.
The default user credentials are as follows:
-
Username:
admin -
Password:
admin
After you sign in for the first time, you should immediately change the admin account’s password to a secure one.
|
The first time you log in, Meridian prompts for permission to allow the Data Choices module to collect and publish anonymous usage statistics to https://stats.opennms.org. The OpenNMS Group uses this anonymized information to help determine product use and to improve the Meridian software. We do not share it with third parties, and we will not use it for sales purposes.
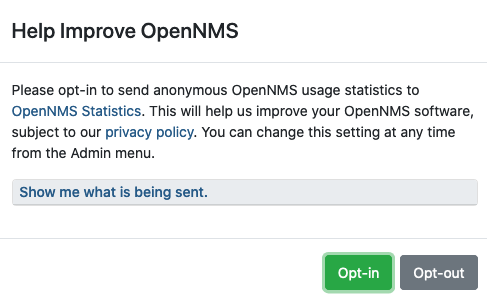
Click Show Me What is Being Sent to see what information we collect. Statistics collection and publication happen only if an admin user opts in.
| Admin users can enable or disable statistics collection at any time. |
To change your account’s password, follow these steps:
-
On the top menu bar, click .
-
Type your current password and new password in the appropriate fields.
-
Confirm your new password, and click Submit. The password is updated.
We encourage you to use Meridian with individual user accounts instead of the admin account.
If all users have individual accounts, you can see who is completing tasks like clearing or acknowledging alarms.
For information on how to create a personalized user account, see Create a new user in the Quick Start guide.
First monitored node
The default configuration will discover a single node with an interface 127.0.0.1 and detect services exposed on the loopback interface, including the OpenNMS-JVM service.
Nodes with this service have JMX-based data collection performed on Java JVM statistics such as heap memory and open file handles.
Next steps
See the Quick Start guide for more information on setting up and configuring your Meridian instance.