Getting Started
Meridian installs with a base configuration that automatically begins service-level monitoring and reporting as soon as you provision managed entities (nodes, IP interfaces, SNMP interfaces, and services).
Meridian has three methods of provisioning:
-
asset import through the RestAPI
Use auto discovery if you do not have a "source of truth" for your network inventory. Auto discovery can become that source. Be aware that auto discovery can include entities you do not want to monitor, if not properly configured.
Directed discovery is effective if you know your inventory, particularly with smaller networks (i.e., 100–200 nodes). It is also useful for areas of your network that you cannot auto discover.
Regardless of the method, provisioning is an iterative process. You will need to fine-tune your results to exclude or add things to what you monitor.
Before you begin
If you collect data via SNMP or are monitoring the availability of the SNMP service on a node, you must configure SNMP for provisioning before using auto or directed discovery. This ensures that Meridian can immediately scan newly discovered devices for entities. It also makes reporting and thresholding available for these devices.
In addition, you may want to edit the default foreign source definition to specify the services to detect and policies to apply during discovery.
Configure SNMP for provisioning
Proper SNMP configuration lets Meridian understand network/node topology and automatically enables performance data collection. Meridian updates network topology as it provisions nodes.
-
In the web UI, click the gear icon in the top right.
-
In the Provisioning area, choose Configure SNMP Community Names by IP Address, and fill in the fields as desired:
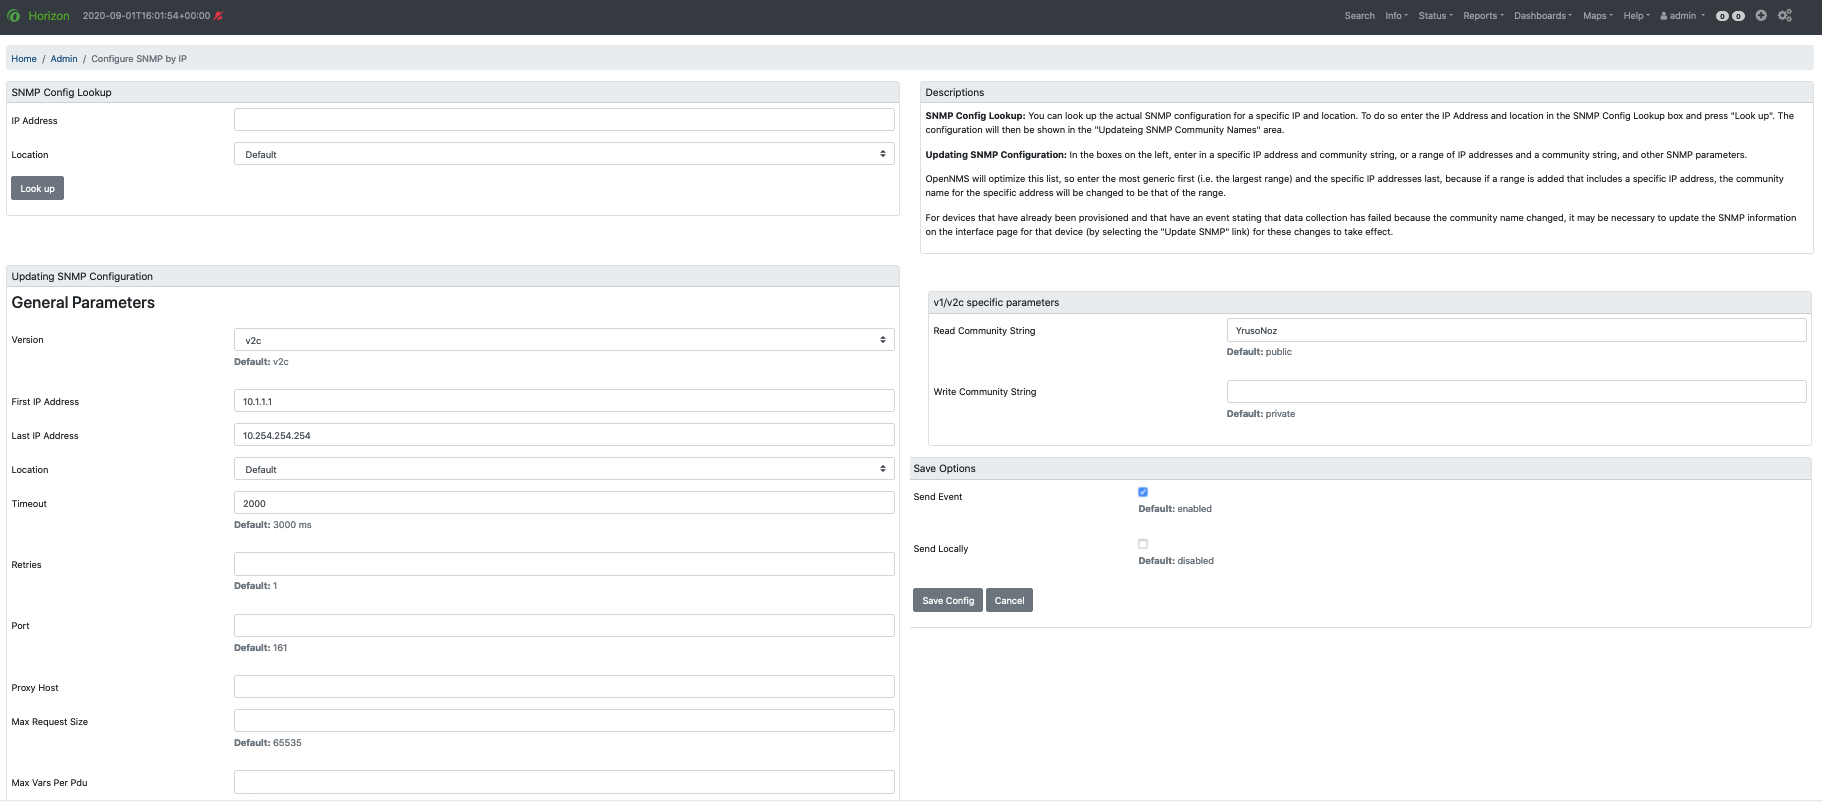
This screen sets up SNMP within Meridian for agents listening on IP addresses 10.1.1.1 through 10.254.254.254.
These settings are optimized into the snmp-configuration.xml file.
For an example of the resulting XML configuration, see Configure SNMP community names.
Edit Default Foreign Source Definition
The default foreign source definition serves as a template that defines the services to detect on (DNS, FTP, ICMP, etc.), the scan interval for discovery, and the policies to use when provisioning.
Policies determine entity persistence and/or set attributes on the discovered entities that control Meridian management behavior. Provisiond applies the existing default foreign source definition unless you choose to modify it.
-
In the web UI, click the gear icon in the top right.
-
In the Provisioning area, choose Manage Provisioning Requisitions.
-
Click Edit Default FS.
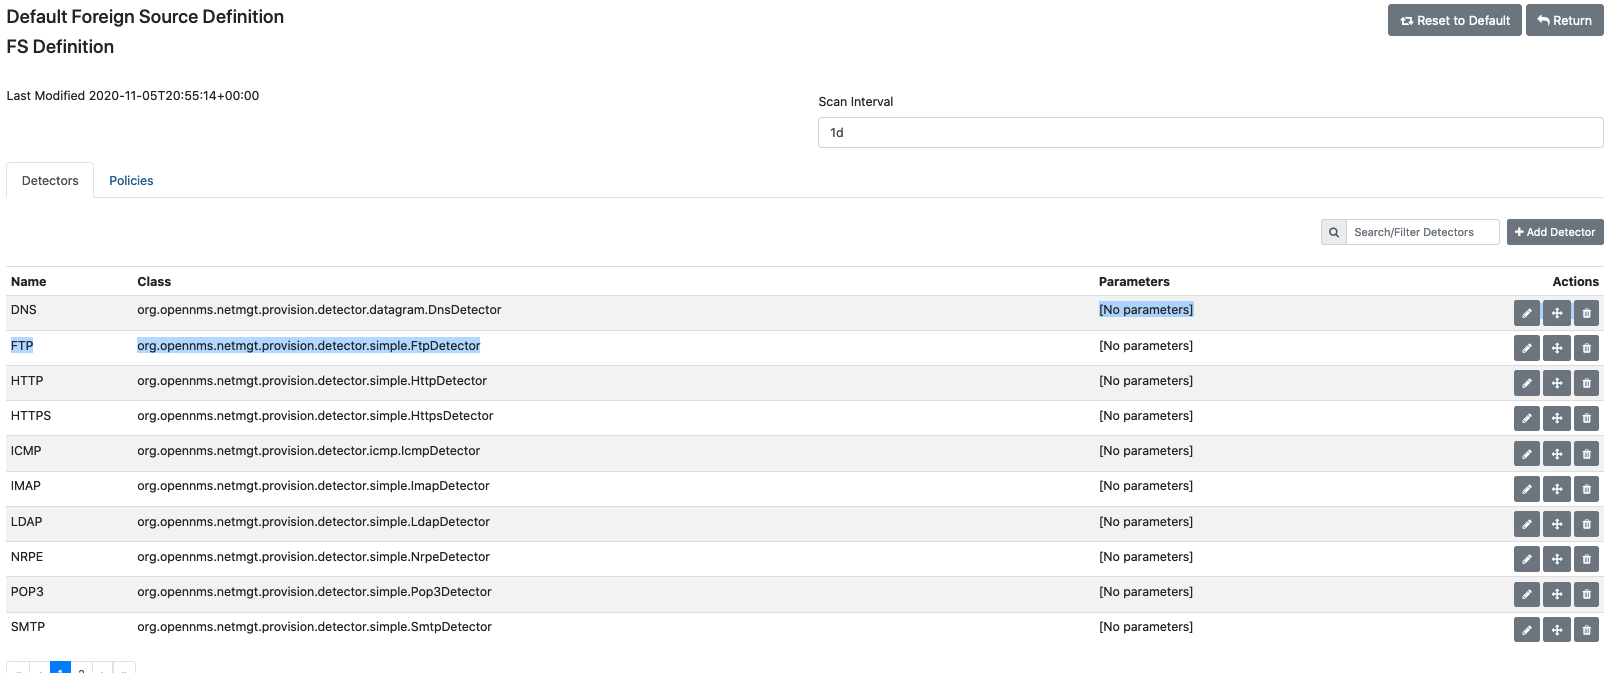
The screen displays the list of service detectors and a tab to view and define policies. Provisiond scans the services in the order in which the detectors appear in the list. -
Click the appropriate icon to edit, delete, or move a service detector.
-
You can also add parameters to a detector, including retries, timeout, port, and so on, by clicking the Edit icon and choosing Add Parameter.
-
-
Click Save.
-
If desired, update the scan interval using one of the following:
-
w: weeks
-
d: days
-
h: hours
-
m: minutes
-
s: seconds
-
ms: milliseconds
For example, to rescan every six days and 53 minutes, use
6d 53m. Specify0to disable automatic scanning. -
-
Click Save.
-
Click the Policies tab in the Default Foreign Source Definition screen.
-
Specify a name for the policy, select the class from the drop down, and fill out any information associated with that class.
-
Use the space bar to see the options for the fields.
-
-
(optional) Click Add Parameter to add additional parameters to the class, or Save.
-
Click Save.
-
Repeat for any additional policies you want to add.
-
Click Save at the top right to save the FS definition.
| To return to the default foreign source definition, click Reset to Default. |
Create a requisition
A requisition is a set of nodes (networked devices) that you want to import into Meridian for monitoring and management. You can iteratively build a requisition and later actually import the nodes in the requisition into Meridian. Doing so processes all of the adds/changes/deletes at once.
| Organize nodes with a similar network monitoring profile into a requisition, so that you can assign the same services, detectors, and policies to model the network monitoring behavior (e.g., routers, switches). |
This procedure describes how to create an empty requisition. Links to additional information on customizing a requisition appear at the end of the procedure.
-
In the web UI, click the gear icon in the top right.
-
In the Provisioning area, choose Manage Provisioning Requisitions.
-
If you haven’t already, edit the default foreign source definition to define services to detect.
-
Click Add Requisition, type a name, and click OK.
-
Click the edit icon beside the requisition you created.
-
(optional) Click Edit Definition to define the services, policies, and scan interval to use for this requisition.
-
Do this only if this requisition differs from the default foreign source definition already configured.
-
| The requisition remains red until you synchronize it with the database. |

Once created, you can add nodes to the requisition.